In the Snipping Tool, Microsoft combines Snip, Sketch, and the Snipping Tool into one screenshot and markup application.
The company recently decided to merge the two tools into one as many users preferred the native snipping tool. On the Microsoft Store, you can now download Snip and Sketch, an app that offers the best of both worlds.
Windows 11 brings several changes to Microsoft’s apps. One recommendation is to use Snip & Sketch in combination with a Snipping tool. It is still called the Snipping tool, even though it combines features from both tools. Let us help you learn how to use Windows 11’s Snipping tool.
How to Use the Snipping Tool to Take Screenshots?
Windows has had the ability to take screenshots with the Snipping Tool for a long time, but with Windows 11 comes a new version of this app that combines all the best features of Snipping Tool and Snip & Sketch.
There are various methods for taking screenshots in the new app. You can select a rectangle or use the free mode, or capture a window or the entire screen quickly. Additionally, there is a new editor that allows you to crop, annotate, and share the screenshots.
With Windows 11, you can take screenshots in different ways using the Snipping Tool. Please read more step by step ways for snippet tools.
App Usage
Snipping tool can be found in the list of apps on Windows. Here’s how to use it:
- Type Snip into Search. Click on the Snipping tool. It will open. If you would like it to be available all the time, you can pin it to the taskbar. The Snipping tool is available in the Microsoft Store if you do not find it in Windows 11.

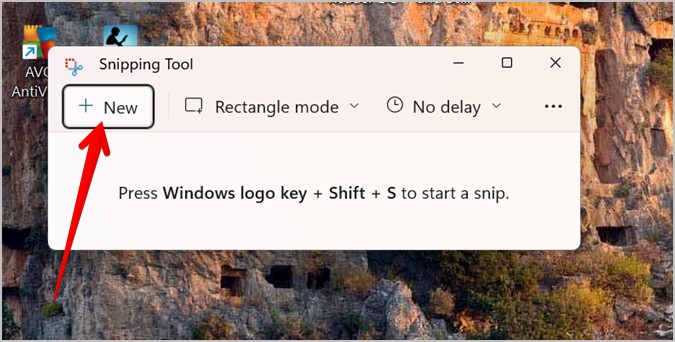
- On the screen, you will see the Snipping tool window. Tap the app or the window that needs to be captured. From the Snipping Tool, click on the New button.

- When the screen begins to darken, the snipping screen will appear at the top, displaying four options to take screenshots. You can define the area to take a picture of.

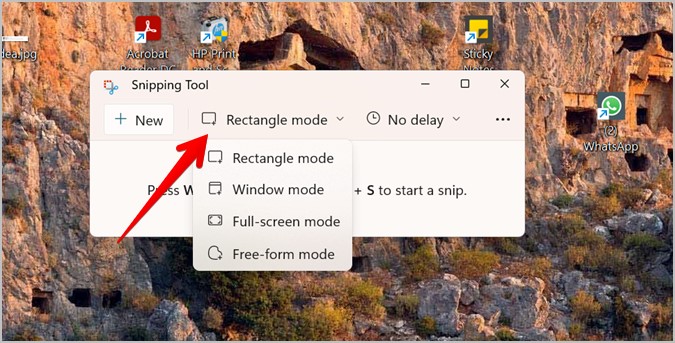
Rectangular Mode: By default, this is the first option. A rectangular form is used to define the area to be captured. Click and drag the mouse to define the area to capture.

Snipping Mode: Using this mode, you can draw the area freehand. There is no restriction on the shape of the selected area since it can be of any shape.
Windows: You can take screenshots of any window on the screen using this mode. It is as simple as clicking once on the window in order to capture the screenshot with just the window in it.
Full-screen capture: Select any part of the screen to capture a full-screen screenshot.
Note: You can switch between these modes by pressing Tab and Enter. To exit the snipping screen, you need to press the ESC key or click the X icon next to the modes.
- A screenshot will automatically be opened in Snipping Tool editing mode as soon as you capture it. In the following sections, we will cover how to edit and save screenshots in the Snipping tool.
Set Default Screenshot Mode
For future screenshots, you can change the default mode by clicking on the Rectangle button in the app and selecting the desired mode. By clicking on the New button again, it will open the new default mode.
Adding a Delay
When you choose the required area, the screenshot is taken automatically. You can delay the taking of screenshots by up to 10 seconds. Before taking a screenshot, this opens the app/screen or performs some task. You can select a delay time by clicking the No delay button in the app.
2) Keyboard Shortcuts
A keyboard shortcut is also available for activating the Snipping Tool. The screenshot tool is opened by pressing the Windows logo key plus Shift + S. Be aware that using this shortcut will not open the Snipping program; instead, the screen will darken and you will be taken directly to the snipping window. Capture a screenshot by selecting the required mode.
3) Using Print Screen
Regularly capturing screenshots with the two methods above might seem slow. A good way to use the Snipping Tool is to assign it to the Print Screen key on the keyboard. Accessibility > Keyboard > Windows Settings. Open screen snipping when you toggle the toggle next to Use the Print screen button.
By pressing the Print Screen key, you will immediately be able to select between the different modes on the snipping dialog box.
Please note: You can add a delay to screenshots by using method 1.
How does the Snipping Tool save screenshots?
Neither of the last two methods will automatically save the screenshot to your computer. When you take a screenshot, your computer will display a notification. You can use the Snipping Tool to edit it by clicking on it. In case you did not see the notification or you missed it, go to the Action Center and look for the Snipping tool notification.

Moreover, the screenshots are copied to the clipboard. The snippet can be pasted directly into any app, such as Paint, Word, Google Docs, etc., without needing to open it in the Snipping Tool.
What is a Snipping Tool for editing screenshots?
Snipping Tool includes several editing tools in the top bar. Here are some tips on how to use them.
Drawing on screenshots
With Snipping, you can annotate images with a ballpoint pen or highlighter. Activate the Ballpoint or Highlighter tool by clicking on them when the image is in Snipping Tool editing mode. Draw/write on your screenshot. Click on the tools again to adjust their sizes and colors.
Annotations are erased
Using the Eraser tool, click on any drawing on the image and use the mouse or finger to remove it. You can use the Eraser tool to delete all annotations by double-clicking on the tool and selecting Erase all ink.
Protractor and Ruler
The Snipping Tool can neither draw straight lines nor circles . But you can use both rulers and protractors for this purpose. Each tool should be used simultaneously.
You can enable the ruler by clicking on the Ruler icon in the menu bar. Once enabled, the ruler appears on the image. Select Protractor from the menu when you double-click on the Ruler icon.
To change the ruler’s position, drag it. By using the mouse scroll bar, you can adjust the angle of the tool by hovering the mouse pointer over it. You will need a ruler or protractor if you want a straight line. Draw the line using a pen or highlighter tool.
To hide ruler or protractor, double-click on the Ruler icon followed by clicking on the active tool. That will hide it.
Screenshot Crop
Use the Crop tool if you want to remove a part of your screenshot that has been captured. Enter the cropping mode by clicking on the Crop icon. Draw a rectangle around the area you want to crop. You can confirm your selection by clicking on the checkmark icon or by pressing Enter.
Capture a screenshot
After you have edited the screenshot, click the Save button or press the Ctrl+S keyboard shortcut to save it. Click Save to save the image. The screenshot will have a name and it will be saved to your preferred location.
Conclusion
Microsoft has released Windows 11 for laptops, desktops and other devices on 05 October 2021. When it has released there are many changes have been inducted. Few changes were made in Snipping Tool, we have tried to cover and teach you how to use this snipping tool.
If you have questions then you may ask in the comments.
